CLEO VIP
Be sure to check out your welcome email to discover what #theCLEOeffect is all about.
specs
Due to its lightweight, ergonomically optimal design, you’ll be able to create the most beautiful masterpieces. Forget your bulky, heavy machines. CLEO is here to revolutionize the game.
Wireless: Wires are so yesterday! No more messing around with unnecessary cables.
Soft stroke: With a setting of 2.2mm, it is perfect for shading and hair stroke techniques.
Lightweight: Weighs only 3oz. Long days of working will feel like a breeze. No more aching wrists.
Slim design: Grip diameter of 17mm. Ergonomically optimal design for comfortable use. Built for precision work.
Strong motor: High quality brush motor built to meet the demands of various PMU techniques.
Universal needle fit: Use your favorite brand of universal needle cartridges.
Voltage output: 5.0V-8.0V. Easily increase in increments, from soft to strong, catering to all permanent makeup needs.
QUICKSTART VIDEO
QUICKSTART GUIDE
- You can peel/scratch off the protective, clear film on the battery’s LED screen.
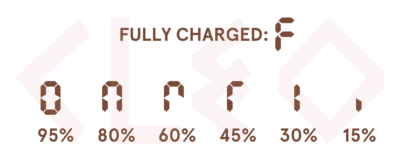
- The battery attaches to the machine by a magnet. To remove the battery for charging, make sure that the machine is powered off and pull the battery straight out. Do NOT twist the battery while it is connected to the machine as this may damage the connecting electrical prongs. Be sure to use the plug and power adapter that was included with your machine to ensure a quick charge. When fully charged, the battery will show an “F” on the screen.
- To attach the battery to the machine, align the battery to the front of the machine body and let the magnetic connection snap firmly in place. There should be no gap.
- Notice that your needle has a raised side which will slide into the machine’s groove (look at the machine to notice where the grooves are to align with the needle’s raised sides). Once the needle is inserted, firmly twist the needle to lock it in place (if the needle is pointed up to the ceiling, then you would need to twist clockwise). Gently pull the needle out to test if it is locked in place. If you are able to pull the needle out, then it has not properly been locked.
- Press and hold the button on the battery head for two seconds to turn on the machine.
- First, you will see the battery level indicator on the screen. Please refer to the chart below for all the battery level indicators and corresponding percentage levels.
- Next, you will see the speed level shown on the screen. The number is blinking, which indicates it is on standby mode. Press the button twice to change the speed.
- Finally, to turn on the motor, press the button once. You will hear a buzzing sound. You can also change the speed level while the motor is powered on. Just press the button twice. To return to standby mode and turn off the motor, press the button once while in use. Press and hold the button for two seconds to completely power off the machine.
- Do not insert the needle while the motor is powered on. If you do not have a needle inserted in the machine at this point, return to standby mode or turn the machine completely off and then insert the needle.
- You must adjust the needle length while the motor is powered on (not on standby mode). Turn left or right on the lower body to change the needle length. When you first receive the machine, it may be set all the way to the longest length. With the needle facing to the ceiling, start by turning the body clockwise to shorten, if needed. We recommend a length of approximately 1.5mm. If your needle length is too short, the ink will spill out. If your needle length is too long, no ink will flow, and ink will not be deposited.
- Your CLEO kit comes with two batteries for a total working time of up to six hours (each battery lasts between 2-3 hours). The battery takes approximately 1 hour to charge fully, and you can charge in between uses. Extra batteries are available for purchase with more color options.
battery
The battery attaches to the machine by a magnet. To remove the battery for charging, make sure that the machine is powered off and pull the battery straight out—do NOT twist the battery while it is connected to the machine, as doing so may damage the connecting electrical prongs.
Your order comes with two batteries for a total working time of up to six hours (each battery lasts between 2-3 hours). The battery takes approximately one hour to charge fully, and you can charge in between uses. Extra batteries are available for purchase with more color options. Be sure to use the plug and power adapter that was included with your machine to ensure a quick charge. The screen will show an F to indicate it is fully charged.
There is a protective, clear plastic film on the LED screen. You can scratch/peel the film off of the screen.
Please refer to the chart below for each battery level indicator and its corresponding percentage levels.

speed to voltage output
Voltage Output: 5.0V-8.0V. Quickly increase in increments, from soft to strong, catering specifically to all permanent makeup needs and meeting the demands of various techniques.
Speed 1: 5.0V
Speed 2: 5.7V
Speed 3: 6.5V
Speed 4: 7.2V
Speed 5: 8.0v
Tip from BROW DADDY: For his signature ombré brows, he uses speed 3 for the body of the brows and speed 2 for the ombré fronts.
needles

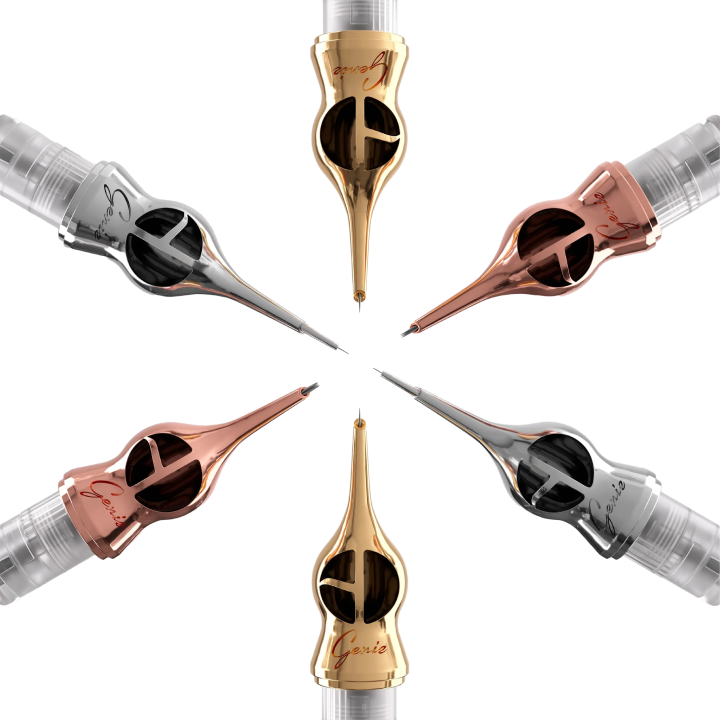
This machine uses safety needle cartridges with a universal fit. It is compatible with popular safety cartridges needles like Kwadron Optima, Tina Davies, Dragonhawk Mast, Vertix Nano, the upcoming Genie Needles, and much more. Only use new, sterile-packed needle cartridges with a safety membrane.
Notice that the needles have a raised side which will slide into the machine’s groove. Once the needle is inserted, you must firmly twist the needle to lock it in place.
Adjust the Needle Length to approximately 1.5mm. You must adjust the needle length while CLEO’s motor is powered on. Please refer to the QuickStart video for instructions. If your needle length is too short, the ink will spill out. If your needle length is too long, no ink will flow, and ink will not be deposited. This principle applies to all PMU machines. Train your eye to recognize the sweet spot for the needle length.
MACHINE COVER
This machine is NOT autoclavable. To prevent cross-contamination and the spread of infectious diseases, always use a tattoo machine cover or barrier film to completely cover your CLEO and only new, sterile-packed cartridges with a safety membrane. After each procedure, we suggest using medical-grade disinfecting wipes to clean the machine thoroughly.
CERTIFICATIONS
CE certified to confirm compliance with EMC Directive 2014/30/EU and LVD Directive 2014/35/EU.
UK CA certified to confirm compliance with the council of Electromagnetic Compatibility Regulations 2016.
FCC certified to confirm compliance with the requirements set up by ANSI C63.4 & FCC part 15 regulation for the evaluation of Electromagnetic Compatibility.
RoHS certified to confirm compliance with the council RoHS 2.0 Directive 2011/65/EU Annex II (EU) 2015/863 as last amended by Directive (EU) 2017/2102.
WARRANTY INFO
Your CLEO comes with a six-month limited warranty. It covers any defects in material or workmanship under normal use during the warranty period, which we will repair or replace at no charge.
The warranty does not cover damages resulting from negligence, unauthorized modification, or liquid damage. It does not cover conditions, malfunctions, or damages not resulting from defects in material or workmanship.
To obtain warranty service, please contact us at cleo@browdaddy.com to determine the problem and the appropriate solution for you. We require proof of purchase for all warranty claims.
CONNECT WITH US
These days, there are so many different ways to stay connected with those we care about. Luckily, we won’t make you choose— connect with us across our various social media channels. Also, we invite you to join our Facebook group PMU WINNERS for continued support and tips. Click the social icons below and connect with us.